
The awesome folks at Incoco sent me these nail wraps to try out, listed in the order pictured above:
They didn’t know it when they sent them I am sure, but they just happened to send me Roller Derby themed wraps that relate to my league here in San Diego. This made me so happy and I knew I would have to recruit a few of the San Diego Derby Dolls to battle test these nail wraps. Nobody can test a nail wrap as thoroughly as these hard hitting, hard working women for sure!

Picture Credit: Incoco, Logo: San Diego Derby Dolls

Picture Credit: Incoco, Logo: SDDD Diego Rollers

Picture Credit: Incoco, Logo: SDDD Swarm
Incoco Nail Wrap Party
I enlisted a few Derby Dolls to help me test out the Incoco nail wraps since keeping something on my nails for two weeks is almost an impossibility at this point. Because of the blog I paint my nails just about every other day now!
Everyone did there own application and we had a lot of different size and shaped nails to test out the fit of these strips. One issue we had was getting a clean nail tip — a few may have pulled and filed instead of folding the strip over and carefully filing downwards. Here they are newly applied.

Incoco Nail Wrap Progress Report
Everyone was awesome and sent in progress reports from their personal phone cameras so that we can see how the strips wear. Here they are compared side by side – applied, after one week and at two weeks. Click on each image to view them full size.
|
Incoco Fresh Rain Applied |
 Incoco Fresh Rain Week 1 |
 Incoco Fresh Rain Week 2 |
Fresh Rain User Notes
- Nails held up really well – even after she ran a Zombie/Run For Your Lives Race!
- Why the crack on her index finger at week 2? Using nails as tools to remove a dead battery.
- Didn’t fit the shape of her nail beds too well. Also, when she ripped off the silver tab for the alternate sizing it didn’t rip off clean like the other side, leaving a bit of a torn/frayed edge.
- At first she wasn’t sure she would try them again, but in the end decided that she would since they held up so well. Next time she would try trimming the silver end off with scissors instead for a clean edge and to match the shape of her nail bed better.
 Incoco Fresh Rain BCN |
 Incoco Fresh Rain BCN with Nail Art |
 Incoco Fresh Rain/Paradised Found BCN |
BCN Notes on Fresh Rain
- Ridges! I don’t buff my nails so I skipped that step but as you can see here you really shouldn’t with these nail wraps. The nail bed has to be nice and smooth or the end result will not be.
- I experimented adding a topcoat and basecoat, and both worked just fine. On the middle pic I added a top coat an on the last one I had added a one coat of basecoat which helped to smooth out the appearance of my ridges. I bet if I had used a ridge filling coat you can get away without buffing using a basecoat.
- You can add nail art and use the extras to make custom nail art. These are really just perfect for this since they are so thin and pliable AND they can be re-positioned.
|
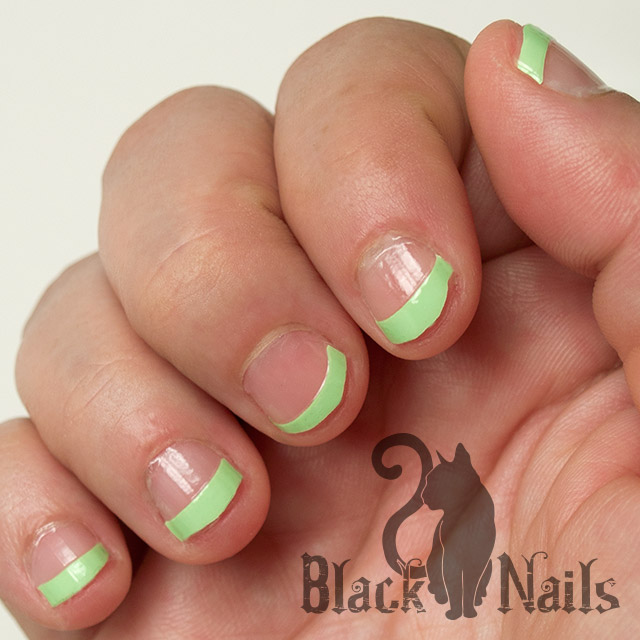
Incoco NY Lights Applied |
 Incoco NY Lights Week 1 |
 Incoco NY Lights Week 2 |
NY Lights User Notes
- Got a lot of compliments!
- Really easy and fast to apply — the topcoat was really easy to use, but the tips are hard to line up.
- Liked how the silver tab pulled off and it still followed the cuticle (as opposed to the user for Fresh Rain).
- Long lasting – She plays derby a few times a week and sanded wood by hand!
- Totally a picking deterrent – “They look so nice I don’t want to chew!”
- Stain easily with ball point pen.
- Liked how when the edges close to the cuticle (or that maybe got overlapped when applied) grew out she could “chip” off the ugly part to leave the rest of the top coat clean looking.
- “Overall, I’m a huge fan” and she would use them again.
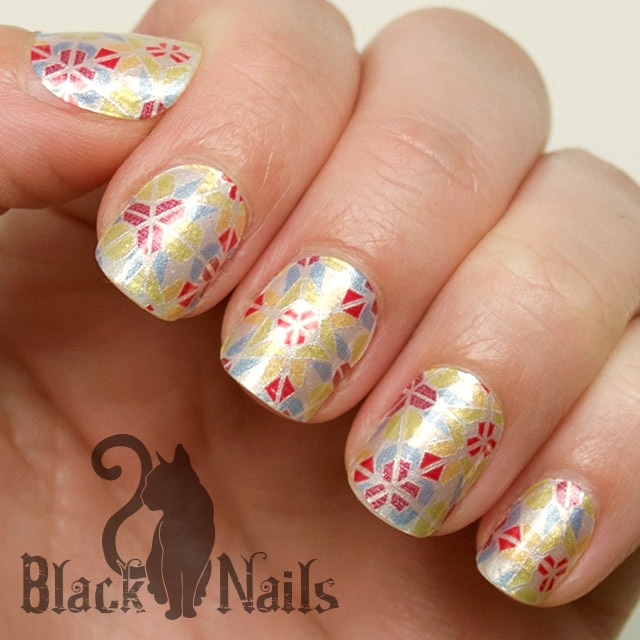 Incoco Paradise Found Nail Applied |
 Incoco Paradise Found Week 1 |
 Incoco Paradise Found Week 2 |
Paradise Found User Notes
- Also received lots of compliments!
- Careful to only file the nail you are working on when removing the excess.
- Thought they would lead to less nail picking since they made her nails look so nice.
- Lasted a very long time.
- Would use the strips again.
Incoco Nail Wrap Review
- Price – $7.99-$9.99 available from Incoco. Also available at select nail bars and Amazon.
- Official Site – Incoco
- Description – Real nail polish nail strips with a built in basecoat and topcoat for the ultimate all in one nail wrap and manicure.
- Best Use – Full manicure, solid polish or nail art.
- Size – 16 double-ended strips that come on 2 sheets of 8. Each strip is 1.25 in/3 cm long and vary in width from 0.39-0.75 in/1-2 cm wide, ranging from pinkie to thumb.
- Packaging – Comes in a small cardboard envelope with the nail file and cuticle stick separate in a little plastic pouch. Two sheets of 8 double sided strips that break apart.
- Ingredients – “3 Free.” Full list of ingredients from Incoco B2B.
- Cruelty Free – Yes, not tested on animals.
- Uniformity – Perfect. Since these are manufactured “stickers” the designs are perfectly uniform (when they are supposed to be).
- Opacity – 100% opaque, full coverage color.
- Color – HUGE selection ranging from solid colors, designs and tips. The strips look almost exactly like the Incoco website – the colors on the website are a bit lighter than the real life product, but just barely.
- Dry Time – Although technically they are not “wet” they are 95% dry to make them pliable so they take 15 to 30 minutes to set to your nails.
- Durability – Ridiculousness! This is where this product stands out above all others. These strips last so long you will eventually take them off only because your nails “look like they need a fill,” not because the polish is damaged.
- Removal – Fairly easy — using regular acetone it removed just like normal polish that has a good basecoat and topcoat in about 10 seconds per nail.
- Ease of Use – Easy to apply once you get the hang of it. At my nail wrap party everyone did their own nails in about 15-20 minutes tops. They all agreed it was for sure easier to apply than nail polish!
- Recommend It – Yes! These are easy to use, quick to apply and super long lasting. Would be great for vacation where you won’t have time to do your nails, but still want them to look good.
My only real issue with these is that I can’t have something on my nails for that long since I basically paint my nails every other day at this point! That is why I recruited my friends to try out the nail wraps on my behalf. They unanimously loved them and would for sure use them again.
And for kicks, what happened when I showed a guy? He of course couldn’t tell if it was nail polish or not. He just thought it looked good and asked if I did it myself. Ha!
Incoco Nail Wrap Up – The Good & Bad
The Good
- Easy and fast to apply, much more so than regular nail polish.
- Don’t have to worry about tacky nails – 95% dry on application they only need 15 to 30 minutes to set to your nails.
- Smooth edges — as compared to the more blunt edges of a Minx manicure (as reported by the Fresh Rain user).
- Lasts for the claimed 2 weeks with minimal wear and tear.
- Picking deterrent.
- Clean up is easy – both after application (just throw everything in the trash) and on removal (just a few seconds per nail).
- Can be top coated for longer wear or if you prefer to add nail art or have your tip wrapped.
- Has extras so you can get a proper fit, and have some left over to use for nail art of course!
- Huge selection of colors and designs.
- All four of us would for sure use them again and recommend them to others!
The Bad
- Silver tab side doesn’t rip off smoothly every time, leaving a less than clean line on the alternate sizing end, which may just fit your nail shape better.
- Some of the ends are rounded, and some squared, but only in select sizes so they might not always perfectly match your nail shape and size.
- If you have pronounced ridges like I do you will need to buff your nails smooth for these to have a smooth and even finish.
Comparison to Similar Products
- Bang for your Buck – Contains 16 strips as compared to 18-28 for other brands such as Jamberry (really more like 36), Kiss, Maybelline, and NCLA. Same number as Sally Hansen. Minx is one manicure only since it is done in a salon.
- Cost – About the same as Kiss, Maybelline and Sally Hansen. Others:
- Jamberry – $15.00
- Minx – $35.00 – $60.00
- NCLA – $16.00
- Selection – Just for fun, how many design/color choices does each company have:
- Wear – Lasts about 3-5 days longer than your typical nail wrap such as Kiss (only 1 week), Maybelline and NCLA. Lasts just as long as Jamberry and Minx claim to, although I haven’t personally used either.
Incoco Nail Wrap Colors
Incoco has a ridiculously large color selection and I am sure EVERYONE will be able to find at least a handful of must have designs that personally speak to them.
- Nail Colors – Currently 95 shades from brights, dark, nude, pastels and different finishes including sheer, shimmer, cream, glitter and frost. My personal favorite is the pink/purple glitter applique “Charmed” and gold/black glitter “Cheers!“.
- Nail Designs – Currently 125 designs in all sorts of palettes – patterns, holiday and abstract. I am really digging their new Halloween Collection which has a couple glow-in-the-dark designs!
- French Designs and Colors – Currently 29 shades including neons, patterns, glitters and neutrals.
- French Manicure – Currently in 7 neutral shades to match any skin tone.
- Discount Bundles – Currently they have 31 packs including the discounted Halloween pack.
- Pedicure Colors – Currently in 14 shades including brights, darks, shimmers and one glitter.
- Pedicure Designs – Currently in 9 designs including a few animal prints and pink shades.
- View all Incoco collections – different than the above this is broken out by holiday, season, and collection.
Incoco Nail Wrap Directions
Here are the instructions directly from the Incoco website:
- Remove Clear Cover – Select the size nail polish strips that best fit your nails. Then remove the clear covering, which helps seal and protect the strips since they are made of 100% real nail polish.
- Remove Nail Polish Strip – Gently peel the nail applique from its paper backing by pulling on the silver tab.
- Select End & Remove Silver Tab – To use the other side of the double-ended nail appliqués, carefully break away the silver tab.
- Apply to Nail & Gently Stretch to Fit – Place and smooth the appliqué on your nail until it is wrinkle-free, and gently stretch for a perfect fit. To realign or resize, peel off the nail strips, reposition and re-apply.
- Remove Excess – Crease the nail polish strip over the tip of your nail, and remove the excess by filing in a downward motion.
Full instructions with pictures on the Incoco website on how to apply the nail polish appliques. Learn more with Incoco frequency asked questions.
Incoco Instructional Videos
- How to Apply Nail Polish Strips by Incoco
- Perfect French Manicure Tutorial with Nail Polish Strips by Incoco
- Helpful Tips for Nail Polish Strips by Incoco
Incoco Nail Wrap Tips
- Use the appliques as soon as you open them since the air can dry them out — they are real nail polish so they dry out the same way. Make sure to store your extra in a zip lock airless bag. If you have a vacuum sealer, that is a perfect option!
- Apply your pinky first working in to your thumbs.
- Did you put the strip down on your nail incorrectly? Don’t freak out, the strips can be repositioned.
- What if you get it on your cuticle? You should be able to lift the strip up and reposition it, but if for some reason you cannot you can actually clean it up as normal with acetone, it just takes a bit more time since this is much thicker than your typical manicure.
- Make sure your nail bed and surrounding skin is completely free from oil, buffed and smooth before applying the appliques to ensure proper adhesion and a smooth look.
- The strips are heat sensitive so working with warm hands is recommended. Just rub your hands together for a few seconds.
- Don’t forget to remove the top, clear protective layer BEFORE removing the silver tab. We forgot to remove it first a couple times and once you have just the strip in your hand it is difficult to separate the protective layer.
- When filing of the excess, make sure you are only filing that one finger, and not catching the tips of your other fingers. This is easy to accomplish if you file in a downward motion with your file aligned vertically, same as your finger.
- Can I use a basecoat? Yes, it seemed to apply just the same although I cannot speak to wear since I didn’t leave it on. If you have ridges you can do this instead of buffing.
- Can I topcoat? Yes, from my experimentation you can add a topcoat if for some reason you need/want more than just the built in topcoat, such as after you have added some nail art or if you want to wrap your tips. I used a cheap topcoat and it did not smear or smudge the Incoco applique and the pigment didn’t transfer to the brush.
- Use the excess and extra appliques to cut or punch our custom nail art such as hearts and stars for instant and perfect designs.
- Add nail art! Since these are real polish you can add nail art on top if you get bored with your solid color OR you damage just a small area of one or a couple nails. Cover up the damage with a little nail art to extend the wear of your strips!
Other Bloggers Experience with Incoco Nail Wraps
- Check Out Incoco! by Gnarly Gnails
- Incoco Nail Polish Strips by I Feel Polished!
- Incoco Neon French Tips Mani and Review by Work Play Polish
- Review and Wear Test: Incoco Nail Polish Appliquès by Gotham Polish
Great post! Can I just add… Jamberry wrap sets are $15, but you can get up to 3 applications from each set. So, in the long run you are saving money! You can also purchase the Jamberry heater, it makes the application process a bit easier, as you don’t have to hold the dryer. I have worn my Jams up to 14 days as well…remember they are made out of a non-toxic vinyl, so they also strengthen your nails. The formula has been improved since last year, I would love to send you some samples!!